Editor overview
The editor is where you and Roc build together: chat on the left, your running app on the right, and a workspace behind them for code, data, domains, and settings. This page tours each area so you know where everything lives before you start building.
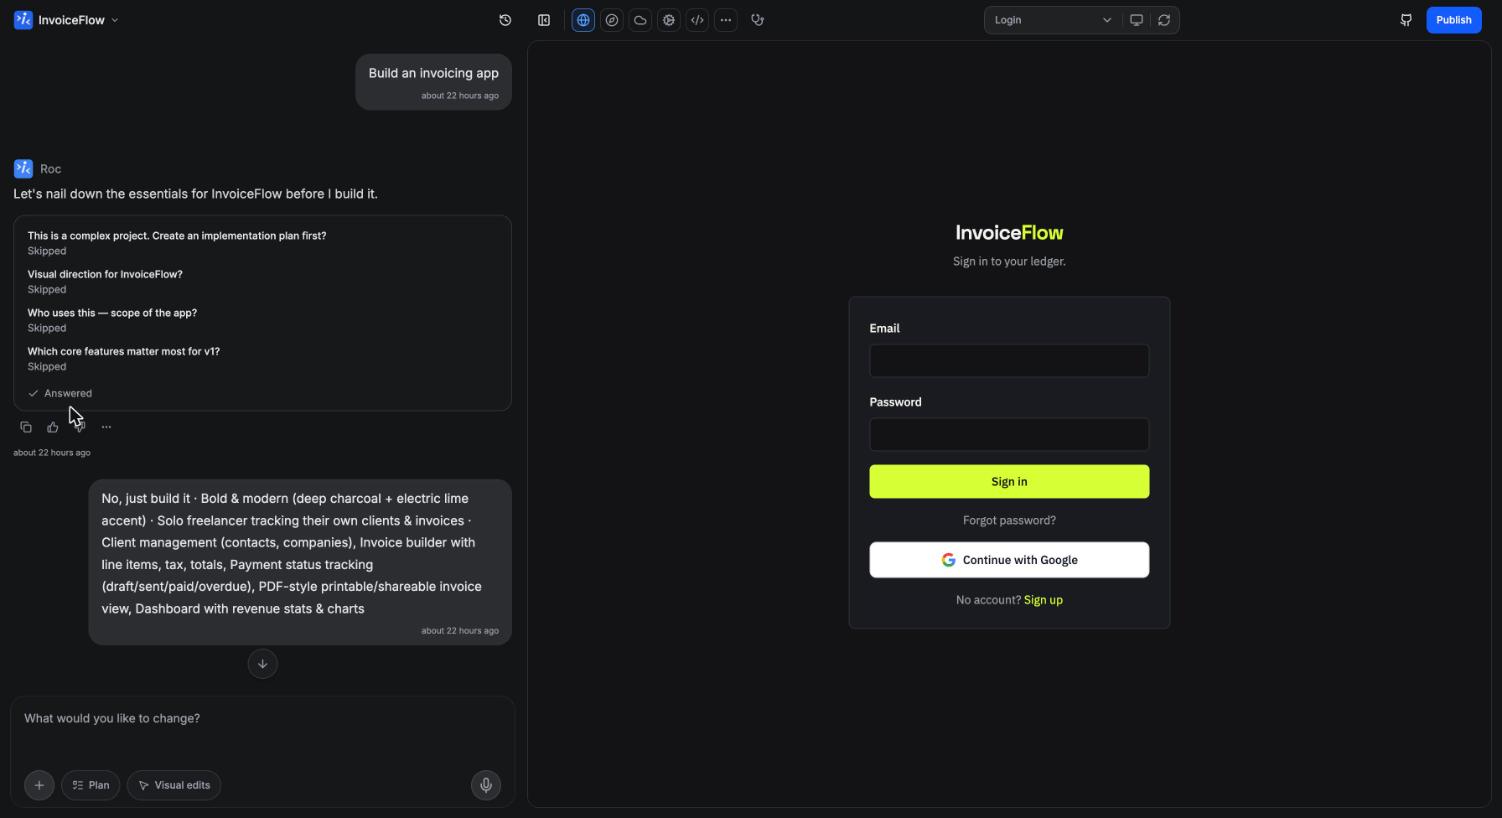
The chat panel
The chat panel on the left is your main way of building. It is resizable, and you can hide it entirely when you want a full-width preview. Every message you send becomes work Roc performs on your app, and every response carries actions: copy the message, rate it good or bad, revert the project to that version, or preview how the app looked at that point. A version history toggle shows the timeline of builds, and you can restore any earlier version. More on this in the AI assistant.
The input toolbar packs a few tools worth learning early:
- "+" menu for Project Settings, History, GitHub, and attaching files or screenshots to your message.
- Plan toggle, which asks Roc to write a step-by-step plan before implementing anything. Useful for bigger changes.
- Visual edits toggle, which turns the preview into a point-and-click editing surface (details below).
- Voice input, so you can describe changes out loud.
- /troubleshoot, a slash command that has Roc explore your running app to find and fix issues on its own.
The preview area
The right side shows your actual app, freshly built and running. It is not a mockup: when Roc finishes a change, the app rebuilds and the preview refreshes, usually within a few seconds. The header gives you a pages dropdown to jump between routes, a desktop and mobile viewport toggle, and a refresh button. If your app hits runtime errors, a badge appears with a count and a click-to-fix flow. See the preview for how rebuilds and error fixing work.
The tool icon bar
Above the preview sits a row of icons that switch you into the workspace views: Preview, Domains, Instroc Cloud, Settings, and Code, with an overflow menu holding Overview, GitHub, and Integrations. These are the doorways to everything that is not chat: custom domains, your backend, the code editor, and integrations.
The workspace panel
Opening any tool icon lands you in the workspace, a full panel with its own navigation: Overview, Domains, Code, Analytics, Security, Integrations, GitHub, Instroc Cloud, App Template, and Project Settings. Once Instroc Cloud is enabled for the project, its section expands into Usage, Data, SQL Editor, Storage, Users, Authentication, API & Secrets, Functions, Webhooks, SEO Routes, Scheduled Tasks, Inbox, and Logs. The backend overview walks through what each of those does.
Publish button and balances
The Publish button sits in the top right and is visible to project owners and admins. After your first publish, an amber dot on the button means the live app is behind your latest changes and needs an update. The publishing flow is covered in Deploy your app.
Nearby you will find two small badges: your credits balance, which AI work draws from, and your cloud balance, which covers what your published apps use. They are separate on purpose; see Credits and Instroc Cloud billing for how each works.
Visual edits
Sometimes describing a tweak in chat is slower than just pointing at it. Flip on the Visual edits toggle and click any element in the preview to open a property panel where you can change its text, colors, spacing, and typography directly, or adjust its classes. The element toolbar also offers an inline "Ask Instroc" prompt for a targeted AI change scoped to that element, plus shortcuts to jump to the element's code or delete it. A save bar lets you keep or discard the whole batch of edits.
Visual edits are ideal for copy tweaks and styling polish, because direct property changes do not spend credits the way a chat request does.
On mobile
The editor works on your phone. Swipe horizontally to move between the chat and the preview, and open the workspace from its drawer. It is a comfortable way to review progress and fire off changes when you are away from your desk.
Next steps
Now that you know the layout, create something with Create a project if you have not yet, or go live with Deploy your app.